Thursday, December 4, 2014

Christmas - 2014


"As God is my witness, as God is my witness it's not going to lick me. I'm going to live through this and when it's all over, I'll never make another ruffled Christmas tree skirt again. No, nor any of my folk. If I have to lie, steal, cheat or kill. As God is my witness, I'll never make another ruffled Christmas tree skirt again."


From a little-known film called "Gone With The Drop Cloth" (I kid...I kid...sorta)


I made a drop cloth tree skirt from the instructions from The Pinning Mama  The instructions were great and I liked how it turned out, but be warned - it is a LOT more work than you think.  Thank God the instructions used hot glue - if it had to be sewed, I wouldn't have it finished until next Christmas.


The decorations for this year were natural and neutral.  The "naturals" actually came from 5 boxes of scented, decorative potpourri I bought at HomeGoods over the past few years.  The first thing I did was open it all up and set it to air out on the sun porch for about a month.  I hot glued ribbon to the pieces and that was it.  Ditto the pine cones, which I've collected & either painted or glittered over the past years.  There are some silvery ShinyBrites, and mercury glass hearts.  These came strung on red velvet in a group (HomeGoods again), and I separated them and hung them separately.


The tree topper is a twine ball I made and painted grey and silver - thanks to The Thinking Closet


and the pink ball in the middle of the tree is my favorite childhood ornament - a ShinyBrite that says "Silent Night".  Sometimes, your color scheme takes a back seat to nostalgia  :)


My mantel was inspired by this stunning photo from Restoration House.  The blog seems to be defunct, but I hope somehow she learns how much she inspired me.


I ordered the birch branch from Etsy!  The lovely Christine in Maine cut it to my specifications for an astoundingly small amount of money.  It was worth it to see the look on the face of the guy at the Post Office when I explained it was a tree branch  :D  Please stop by and see what she offers on AdHocStock!


The burlap-wrapped Christmas tree was the ugliest thing on the $3.00 shelf at Target.  I spray painted it as I did my tree and tarted it up with some little baubles.  I love how it turned out.


Merry Christmas!


I'm linking up at:


French Country Cottage - Feathered Nest Friday
Mod Vintage Life - Mod Mix Monday
Dwellings - Amaze Me Monday
Savvy Southern Style - Wow Us Wednesdays


Friday, November 28, 2014

I Got Flocked! ;)

OK, so not really - but saying that cracks me up.  "Hey, Pamela - whatcha doin'?"  "I can't talk now - I'm flocking!"  I slay me sometimes.

Anyway.  I have a lovely artificial tree that was given to me by a friend.  When I moved to my current place, I was effectually running away from the trauma of my former life and relationship.  This was a new start for me, and the first Christmas here, I did not decorate.  A live tree wasn't in my budget and I just let the holiday pass by.

When my friend heard that, she gave me this tree.  I've always thought it was symbolic in more ways than one, and I love decorating it every year.

In 2011 (the first year I had the tree), it was a traditional red and green tree


2012 - pink!


2013 - glam silver and white


I've always loved flocked trees.  A new tree isn't in my budget, and besides - I love this one.  I tried the spray-on snow one year.  That stuff is manufactured by Satan, Inc.  Ugh - as soon as it dried on the branches, it started flaking off.  I guess in that respect, it was pretty authentic, but it was a real nuisance.

One year, I tried the Ivory Snow flakes snow.  That was an idea from my childhood - you mix Ivory Soap Flakes (not the liquid) with water, and you whip it like you would DreamWhip (also another thing from my childhood best left there).  You then scoop it into your hands and run them along the branches to deposit the "snow".  It looks great, but the smell of Ivory Snow for 4 weeks made me insane.  It never dissipated and it overpowered every Yankee Candle known to mankind.

So this year, I painted the damned thing.  Yep.  I painted my Christmas tree.  

Here's how I did it:

1.  I used Valspar's "Color Radiance" spray paint.  I bought mine at Lowe's - it's about $5.00 a can - I bought 4 cans and ended up using about 3.5 cans.

The color is "Azure Snow".  It's not white.  It's not blue.  It's not gray.  It's that perfect combination of the three that looks like ... well, snow!  It's gloss, but that doesn't matter.


Before I started, I gave some thought as to how real snow falls on real trees.  It doesn't cover the trees completely (usually).  The undersides get less snow than the tops of the branches.

2.  I pulled out the branches (my tree assembles row by row) by row groups and re-shaped the branches as they had been stored in Rubbermaid containers all year.


With the thought of how the snow looks on real trees in mind, I started.  I sprayed the underside of the branches lightly.  Just long strokes of spray up and down the branches.

I then turned it over and did the same on top.  I sprayed a heavier coat on top.  Not so heavy that it drips or clumps the "needles" together, but I tried to mimic how snow would look.  Don't forget the tips of the branches.  

3.  I sprayed two rows of branches and just laid them on the grass to dry.  It was about 50-55 degrees that day and they dried very quickly.

4.  I assembled the first (bottom) row and then brought out the 3rd row of branches and sprayed them.  While they were drying, I assembled the 2nd row of branches.  I followed this method until all the branches were sprayed.  I'd say the entire thing took 3 hours, so there is a bit of time to be invested.

5.  As I moved up to the smaller branches, I realized that since these would be higher up the treed, they'd be eye level and above.  These branches received a heavier coat on the underside because once they were on the tree and adjusted, they would point upwards a bit and the undersides would be more visible.

This is how a finished branch looks:


It's still green, but it has that hazy, snowy look that I love.

Once the entire tree is assembled, it is a very subtle look.  It's not as "in your face" as an actual flocked tree, but I think it's beautiful


Regarding the paint odor - once I assembled the branches, there was a definite spray-paint odor.  The weather permitted me to open the house and I kept it open that day.  Within 48 hours, the odor was gone.  Please keep this in mind if you choose to try this.

My next post will be the fully decorated tree - I'm excited to see how it looks once it's all tarted up ;)


PS - we had real snow for Thanksgiving!


I'm linking up at:

Mod Vintage Life - Mod Mix Monday
Dwellings - Amaze Me Monday
ReFresh/ReStyle - Inspiration Monday
Savvy Southern Style - Wow Us Wednesdays


Saturday, November 8, 2014

Cornices

I made cornices for my bedroom today.  I used the tutorial and photos from The Polka Dot Closet

Everything went just as described in the tutorial.  Everything was pretty inexpensive; the lecture from the guy at Home Depot about why I should pay eleventy billion dollars to a "professional" and "do it the right way - with wood" was free, so woot.

You can see what my bedroom looked like "before" here

The draperies are duvets - "Linen Rose" from Court of Versailles.  I've been collecting them from eBay for two years now with the express intent of making draperies.  Their retail price is horrific - I think the queen duvet was $495.  I managed to buy 2 queens and a king over the past 24 months at prices I can assure do not approach $495 each.

(not my actual bedroom)

detail of the bedding


The bedding is very heavy.  Heavy to the point that when there's even a down alternative filler in the duvet, it's too heavy for me.  So - after I took the duvets apart, here's what I did:

floral side of the queen duvets - I actually used the reverse side.  These are so well-made that I was able to do that.  The reverse floral picks up the bedroom color (I had Annie Sloan "Paris Grey" duplicated in Behr) and the cream reverse almost has a sheen to them.  I lined then using a plain white bed sheet I bought at SprawlMart.  A plain top to slide on the poles.  The sheers are a lace with a medallion that echoes the floral motif.  I'm not sure if I'm keeping them or going to switch to drop cloth panels (more on drop cloth later)

striped side of the queen duvets - these will become my dining room drapes...I'll use the reverse as well.

floral side of the king duvet - I'll hem that and back it with drop cloth and use it as a coverlet on the foot of the bed.

striped side of the king duvet - cornice for my living room.  I also have enough fabric for sofa/settee pillows and I have yards and yards of beautiful cording for trim.

The cornices for the bedroom are done with good ole' Lowe's drop cloths.  I like the 8-ounce weight.  I wash them, and then bleach them in the washer and let them sit in the water overnight.  They come out a beautiful shade of cream.  

Probably the most difficult part was ironing the drop cloth.  It turned out really well, I think.  The trim is a striped piece from the reverse of the duvet.

As usual, I take awful photos - the link above to my bedroom progress has better photos of the true color of the bedroom walls.


This is my other bedroom window -
 to show what they looked like before the cornice

The finished cornice.  The shadows make it look wonky, 
but I assure your my OCD self made certain it was plumb :)

I had been standing on the bed to put up
the L-brackets that support the cornice, so
it looks like I've been wrestling in it.  
(as if...)

My night stands are actually garden
furniture (wrought iron and marble) from 
Bombay Company.  I wish they'd bring that store
back!

I'm very pleased with the outcome - it makes a definite impact when you walk in the room and see the cornice and the beautiful draperies.


I'm linking up at:

ReFresh ReStyle - Inspiration Monday
Dwellings - Amaze Me Monday
Mod Vintage Life - Mod Mix Monday
Savvy Southern Style - Wow Us Wednesdays
French Country Cottage - Feathered Nest Friday


Tuesday, October 14, 2014

Best. HomeGoods. Steal. *EVER*.

I loves me some HomeGoods.  It's like a crack den for home furnishings.  God help me if I ever worked there.  I used to work at Chico's (back when the employee discount was 50% off of retail) and I never saw a paycheck.  I'd be in the red for sure working at HomeGoods.

Anyway, I've gotten some pretty good swag there.  Just recently, two very nice Broyhill faux mercury glass lamps for $19.99 each - down from $60 each.  I still can't figure out what was "wrong" with them - they look great.

But tonight...ah - tonight.  Tonight was the Queen Mother of all hauls - at least for me.

A lot of bloggers that I read can afford to shop at Crate & Barrel and Pottery Barn and Williams-Sonoma and SoftSurroundings.  I used to be able to do that too, and then one day the life I knew ended with a betrayal that has taken me 5 years to process.  I know that sounds very Lifetime TV movie-ish, but it's the basic truth. 

So I went from Talbots and Ann Taylor and Needless Markup and Sur-Le-Table and the aforementioned home stores to Target and Goodwill.  Yeah - I said it.  I'm not ashamed.  I've scratched my way to self-sufficiency and I'm proud of how far I've come.  And I can spot a diamond in the middle of a coal pile and that has served me well in decorating the first place I've ever lived in by myself.

I still get catalogs and emails from my "former life", and I love looking through them and playing "what if".  I've also always been a voracious reader and a fan of vintage everything for as long as I can remember.

Linen brands like Frette and D. Porthault have always fascinated me.  They are the stuff of 1930s novels in which society brides ordered all their "linen" from one of these mystical firms.  Hemstitched and damask and point-d'esprit and the correct placement of monograms fascinated me.

The thought of paying upwards of $600 for sheets is simply beyond my ken, but I still daydream about waking up to a bed full of Guirlande Blanche


So imagine my surprise tonight at HomeGoods when I saw a package of a dozen D. Porthault dinner napkins for $19.99.  Surely, I thought, my reading glasses had finally bought the farm and that package said $39.99.  Nope - $19.99 and "compare at" $45.00.  


Hmm.  That sounded suspiciously cheap, but I ran like Atalanta after those golden apples.  


They're lovely, really.  They are the "Hotel Collection", which I surmise isn't the ne plus ultra of the D. Porthault line but they are beautifully made with a satin stripe. They're large - 22"x22".


"D. Porthault - Paris" is embroidered on the reverse.


According to gilt.com, they retail for $111.00 for 6.  I got them for $19.99 for 12.  My mad math skillz tell me I got them at 90% off retail.  Woot!

I have been an embroiderer/cross-stitcher in the past and I think a tone-on-tone "P" in white perle cotton is just the ticket for an instant heirloom.

I am linking up at:

Dwellings - Amaze Me Monday

Sunday, September 21, 2014

Fall Decor

I'm not a huge Halloween fan, but I do like a transition between summer and the Christmas holiday.

I found these acid green styrofoam pumpkins at Tar-jay for $2.00 each. This will shock all of you, but they don't work with my color scheme  :D


So - I dug into my Annie Sloan Chalk Paint remnants - Old White, Emile (an antique lavender), Duck Egg, Antibes (a grassy green) and a mystery mix of part Paris Grey and part Old White. 


A few coats, some dark wax and in the case of the "boo" white pumpkin, a shot of German glass glitter and now you're talkin'.


This one got a shot of silver leafing - a very glam gourd.


The top of my bowed-glass china cabinet - I love the mix of rustic and refined. 


I haven't had a trick-or-treater in years; I've always lived on rural properties with long driveways which aren't exactly conducive to candy-hunters.  So I'll be having some hot cocoa that I make (with a little ancho chili powder!) while I sit in front of the fire (if it's cool enough) and read something scary - like my online dating site messages  :D

I am linking up at:

Mod Vintage Life - Mod Mix Monday
Dwellings - Amaze Me Monday
Between Naps on the Porch - Metamorphosis Monday
The Dedicated House - Make It Pretty Monday
Coastal Charm - Show and Share Monday
Savvy Southern Style - Wow Us Wednesdays
My Romantic Home - Show and Tell Friday
French Country Cottage - Feathered Nest Friday

Sunday, April 13, 2014

"Tansy"

She's done - and she's exactly like I pictured her in my mind.

She's named for the lovely mother of the childhood friend who believes in what I do and gave me seed money to see if I can actually make a go of this thing I love to do.

To re-cap:

  • stripped the dead, cracking and lifting veneer
  • base is Annie Sloan Chalk Paint in Old White
  • trim is Annie Sloan Chalk Paint in Paris Grey
  • the trim was then silver-leafed, as was the detail on back of the princess bench and the drawer handles
  • the princess bench fabric was a white damask tablecloth from Home Goods that was dyed with the ASCP Paris Grey


In other news, I've made an arrangement with Portland Antiques and Collectibles in Portland, PA to have a space in their store.  I'm not sure of my "opening date", but I'm really very excited.


Here's "her" story;


She belonged to a not-quite-a-star ingenue circa 1944.  A small-town beauty queen, she came to Hollywood to "make it" in pictures. 

She never was really more than a "dress extra", but sometimes she'd get some lines and once Howard Hughes took her out to dinner at the Mocambo.  She'd sit in front of the vanity, which came with her furnished apartment near RKO Studios, and wish and hope and dream.  

Many years later, when she was married to that insurance salesman back home in Tallahassee, she'd occasionally think of that vanity and her short time in the shadow of the Hollywood sign - and have a little cry before she set the table for his dinner.


I'm linking up at:

Mod Vintage Life - Mod Mix Monday
Between Naps on the Porch - Metamorphosis Monday
The Dedicated House - Make It Pretty Monday
Dwellings - Amaze Me Monday
Coastal Charm - Nifty Thrifty Tuesday
Savvy Southern Style - Wow Us Wednesdays
Petite Michelle Louise - Grey Dey Thursdey
Miss Mustard Seed - Furniture Feature Friday
My Romantic Home - Show and Tell Friday
French Country Cottage - Feathered Nest Friday

Saturday, April 12, 2014

What Dreams May Come

The vanity so far:

Then:

And now:


She is turning out exactly as I imagined her.  What I've done thus far:

  • stripped the dead, cracking and lifting veneer
  • base is Annie Sloan Chalk Paint in Old White
  • trim is Annie Sloan Chalk Paint in Paris Grey
  • the trim was then silver-leafed, as was the detail on back of the princess bench and the drawer handles
  • the princess bench fabric was a white damask tablecloth from Home Goods that was dyed with the ASCP Paris Grey


I'm working on the big round mirror now.

I've also made an arrangement with Portland Antiques and Collectibles in Portland PA to have a space in their store.  I'm not sure of the "opening date", but I'm really very excited.


Saturday, March 8, 2014

Vanity, thy name is ...

... mine!

I have always, always, always wanted a vanity.  They have always symbolized beauty and elegance and glamour, and now I have one!

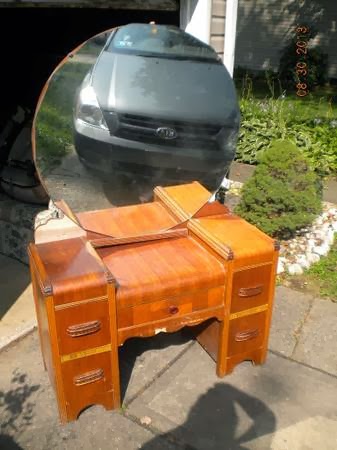
I scored this for $35 on craigslist.  No smells, no wobbles.  The veneer is in awful shape, which is fine because I want to paint her and I wouldn't do that if the finish could be resurrected.

I'm going to let her "talk to me" and tell me what she wants to wear.  My bedroom is Paris grey and white, so I am sure those colors will come into play (along with some silver leafing, perhaps).

Happy  :)


Linking up at:

Mod Vintage Life - Mod Mix Monday
French Country Cottage - Feathered Nest Friday
Miss Mustard Seed - Furniture Feature Friday